Introduction: A Bite of Mumbai’s Heart
In a city as bustling and vibrant as Mumbai, there’s one experience that stands out above all else—its street food. From the chaotic markets to the quiet corners of local neighborhoods, the flavors of Mumbai’s street food scene tell a story of culture, tradition, and community. But what makes it so special? Why does the humble vada pav or the zesty pav bhaji tug at your heartstrings every time you take a bite? Let’s explore the culinary wonders of Mumbai’s street food culture.
The Rise of Mumbai’s Street Food Scene
Unlike fine dining establishments that serve curated dishes to the elite, Mumbai’s street food is democratic. It’s for everyone. And it’s everywhere—whether you’re walking down Colaba Causeway or sitting in the shade of a small by-lane in Andheri, the aromas of chaat, samosas, and pav bhaji swirl in the air. But how did this culture emerge?
Historically, Mumbai was a city of migrants—people from across India coming to the city for opportunities. They brought with them their food traditions, and as the city expanded, these dishes evolved to cater to the fast-paced, on-the-go lifestyle of its inhabitants. Street food became the lifeline of Mumbai’s culinary identity, a place where flavors met convenience, and affordability met taste.
Iconic Street Foods That Define Mumbai
Now, no discussion of Mumbai’s street food would be complete without mentioning the staples. Let’s talk about some of the dishes that have become synonymous with the city.
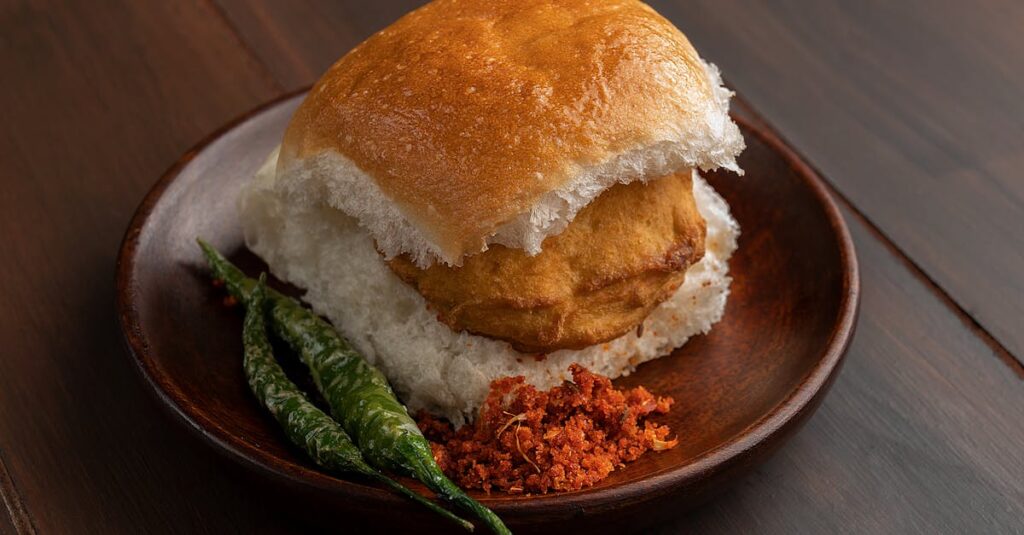
- Vada Pav: Often called the ‘Indian burger,’ vada pav is a deep-fried potato patty served in a soft pav, topped with spicy chutneys. It’s the perfect combination of crunchy, soft, spicy, and savory—a bite that hits all the right notes. It’s so popular that it’s even served at high-end eateries!
- Pav Bhaji: A messy but delightful dish, pav bhaji consists of mashed vegetables cooked with butter and spices, served with buttered pav. It’s a comfort food, a quick meal, and often a late-night snack, especially around popular areas like Girgaon Chowpatty or Marine Drive.
- Chaat: Whether it’s the crispiness of pani puri or the tanginess of bhel puri, Mumbai’s chaat culture is unmatched. Chaat stalls can be found on almost every street corner, offering a variety of sweet, sour, and spicy dishes that bring joy with every bite.
- Sev Puri and Dahi Puri: These dishes are as fun to eat as they are to say. The combination of crisp puris, tangy yogurt, chutneys, and spices makes for a delightful burst of flavor, and Mumbai’s chaatwalas (street food vendors) are experts at putting together these bites of happiness.
Why Mumbai’s Street Food Is Different
So, what makes Mumbai’s street food stand out from the offerings of other Indian cities? The magic lies in the fusion of local flavors with regional influences. Take vada pav for example: the iconic Marathi snack has roots in the streets of Mumbai, but its simplicity has made it popular across India. In Delhi, you may find similar items, but it’s the Mumbai twist—the chutneys, the specific blend of spices—that gives it a unique flavor.
Moreover, Mumbai’s street food vendors are incredibly innovative. Take the famed “dosa” from South India, for example. In Mumbai, it’s often served with a variety of chutneys and sambar, but some vendors have even added a spicy twist—stuffing the dosa with cheese or vegetables, creating variations that are hard to find anywhere else.
Another reason Mumbai’s street food is special is because of the speed at which it’s made and served. With people rushing from one meeting to another or one local train to the next, street food is a quick, affordable, and filling option for those on the go. The vendors are like magicians, whipping up a plate in minutes without compromising on taste.
Street Food Culture in Mumbai: More Than Just a Meal
What’s fascinating about Mumbai’s street food culture is that it’s more than just food; it’s a way of life. It brings people together. Whether you’re sharing a plate of vada pav with friends or grabbing a quick bite on your way home from work, street food is a social experience. It’s a conversation starter, a way to bond over the shared love for something as simple as a hot plate of pav bhaji.
For Mumbaikars, food is an integral part of their daily routine. You can’t walk a block in South Mumbai without seeing a food cart serving hot bhajiyas, sandwiches, or fried snacks. And it’s not just about grabbing a quick bite—it’s about tradition. Every vendor has his or her own recipe, passed down from family to family, and it’s almost like a rite of passage for newcomers to try the famous food stalls in their neighborhood.
Street Food Etiquette in Mumbai: Do’s and Don’ts
Before you head out to savor Mumbai’s street food offerings, there are a few unwritten rules that locals follow. First and foremost, don’t be in a rush. Street food isn’t about fast consumption; it’s about enjoying the process. So, take your time, chat with the vendor, and savor every bite.
- Do try as many varieties as you can: The best way to get the full Mumbai street food experience is by trying a bit of everything. Don’t just stick to one dish; try sev puri, batata vada, and a plate of bhel puri too!
- Don’t forget the chutneys: The sweet and spicy chutneys are the key to a great street food experience. A bite without chutney is like a Mumbai without the sea breeze—just incomplete.
- Do stay hydrated: Street food can be heavy on the spices, so make sure to have a bottle of water or a refreshing drink with you, especially on those hot Mumbai afternoons.
The Future of Street Food in Mumbai
As Mumbai evolves, so does its street food culture. There’s been a noticeable shift in recent years towards more health-conscious and experimental street food options. Vendors are offering gluten-free, vegan, and low-calorie alternatives, while also incorporating global flavors. But despite these changes, the essence remains the same: quick, affordable, and tasty food for the people of Mumbai.
However, the growth of food delivery apps and the push for hygiene standards mean that street food vendors are now working under more regulations. While this is good for food safety, it might lead to some traditional street vendors being priced out of the market. It’s a bittersweet reality for lovers of authentic street food.
Conclusion: A Bite of Mumbai, A Taste of Life
Whether you’re a local or a visitor, eating street food in Mumbai is an experience that stays with you. It’s a reflection of the city itself—ever-changing, fast-paced, and full of flavor. But beyond the taste, it’s the memories we create around these meals that make them special. So, next time you find yourself strolling through the streets of Mumbai, don’t just look for the best restaurant; head to the nearest chaat wala or vada pav stall and immerse yourself in the flavors, stories, and people that make this city truly unique.
Tip: If you’re ever in Mumbai and unsure of where to start, take a walk along Juhu Beach or Marine Drive in the evening. There’s always something fresh, hot, and delicious waiting for you!